

There are several ways to enable ESXi Shell, let's look at all of them in this article. Also, let's take a look at the Timeout option, which allows you to set a timeout for ESXi Shell. This option allows you to set a value (in minutes) before ESXi Shell will be logged on. If you do not log in within this time, Shell will shut down. Usually, few people use this option, but sometimes it is useful because the system leaves some time before it blocks access. When setting theTimeout option using advanced configuration, we will see that we first need to set the wait time and then only go and activate (start) the ESXi Shell (or confirm the stop and start service).
The first option is to enable ESXi Shell using the vSphere Client
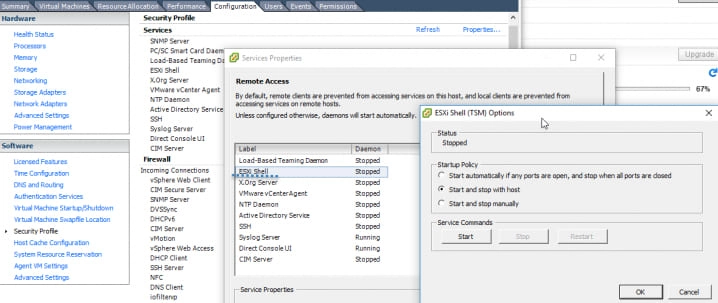
The Windows client for individual ESXi hosts can still be used to configure some settings (not all). Unfortunately, to connect to the vCenter server, you will have to use the vSphere web client (Flash-based) or a pure HTML 5 based client. You need to connect to the host and go to Configuration > Security Profile > Services section, then clickProperties, and select ESXishell from the list.
Remember! WhenStart and stop manually is selected, the service does not start when the host reboots. If you want the service to start when the host reboots, selectStart and stop with host. Next, click Startto enable the service.
The second option is to use ESXi Host Client (based on HTML 5)
This is a new option. We will use the Host client, which is a client based on HTML 5 to configure access to ESXi Shell (no software is required to install on the computer).
You need to connect to the host through
https://ip_of_esxi/ui
Then you need to click on Manage, click on Services tab, select TSM from the list, click on Actions and select STARTto enable the ESXi Shell. Done. You may be wondering, what is TSM? It is the Tech Support Mode. In version 3.5 there was this special TSM mode which you could activate with ALT + F1 and then you would have to type "unsupported" and press Enter. Still that was a long time ago.

The third option is directly through the console user interface (DCUI).
In this option, you will need to have access to the host console. After authenticating to the console, you must press F2 and go to the System Customization menu, select Troubleshooting Options and press Enter. Then press Enter again, because the second menu will already have the correct Enable ESXi Shell position.
That's it. There are other options, such as enabling the SSH protocol, which allows you to send commands from remote SSH sessions (for example, using software such as Putty).
ESXi Shell Timeout configuration
The ESXi Shell timeout can only be configured while the service is stopped. The default timeout for ESXi Shell is 0 (disabled). You can configure timeout through advanced options. There are two ways to do this.
Option 1 - via DCUI.
To set the ESXi Shell timeout from the Direct Console User Interface (DCUI), press F2 to access the system configuration menu, select Troubleshooting Mode Options > Modify ESXi Shell and SSH time outs and press Enter. Then you need to enter the timeout in minutes and press Enter.
After that, press Esc until you return to the DCUI main menu.

Option 2 - through the host client (HTML5)
You need to log into your host and select it, then select the Configuration > Software tab, click Advanced Settings, then in the left pane select UserVars and in the field UserVars.ESXiShellTimeOut enter the timeout value in seconds > OK> done.

For the web client, it is similar, except you can copy and paste the text "UserVars.ESXiShellTimeOut" into the search box to go directly to the desired value. Restarting the service fixes the value. Each time the service is started, it will remain open only for the configured time.


