
Setting up RDP to connect to Ubuntu/CentOS/Debian
Introduction
Using the Remote Desktop Protocol (RDP), you can access and interact with the graphical user interface of a remote Windows server from any location using a network connection. It is important to understand that RDP works on a client-server model, which means that a client for RDP is installed on the local machine and a server for RDP is installed on the remote machine.
In this tutorial, you will learn how to set up RDP to connect to Ubuntu/CentOS/Debian. You will also understand how to establish access to a remote Linux server by configuring and using an RDP connection.
Step-by-Step Guide to setting up RDP and Installing a Desktop Environment on Ubuntu/CentOS/Debian
This step involves installing and configuring a desktop environment on your Ubuntu server. A standard Ubuntu server comes with a terminal environment installed by default. It is necessary to install a desktop environment on the computer in order to access the user interface.
The first step is to connect via SSH to your server and update the list of available packages by executing the following command:
1) Connect to the virtual server via SSH and perform a system update: Ubuntu/Debian
sudo apt-get update
CentOS
sudo yum -y update
2) Then install the necessary packages: Ubuntu/Debian
sudo apt-get install xrdp
CentOS
sudo yum install -y epel -release
sudo yum install -y xrdp
3) Turn on the xRDP utility and run it:
sudo systemctl enable xrdp
sudo systemctl start xrdp
4) Open the RDP port to connect remotely: Ubuntu/Debian
sudo ufw allow 3389/tcp
CentOS
If you are using FirewallD, open port 3389/TCP for RDP
sudo firewall -cmd -- add - port=3389/tcp - -permanent
sudo firewall - cmd - -reload
5) Reboot the xRDP server for the changes to take effect:
sudo /etc/init.d/xrdp restart
Connect to your desktop
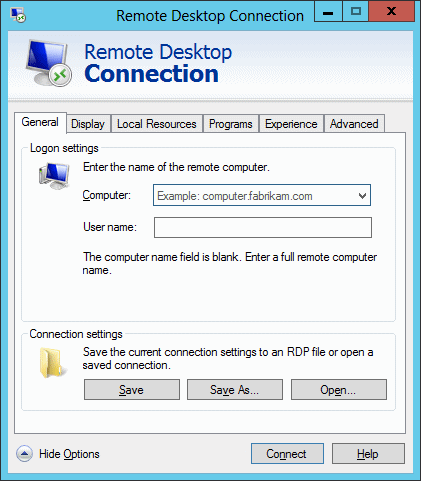
To connect, open the Windows application "Connect to Remote Desktop".
Enter the server IP address and user name and click Connect:
A security warning appears when you connect, this is due to the fact that you are connecting to the Linux family of operating systems. Click on "Yes".
In the window that opens, select Xorg as the session, enter the password for the user, then click OK:
6. If you receive an alert that the Remote Desktop can't connect to the remote computer, check that you have turned on the Remote Desktop option in your system settings.
Important note:
You will see the popup Remote Desktop can't connect to the remote computer as a security measure to ensure that you are connecting to the correct server. If you receive an identity verification popup asking you to verify your identity, press "Yes."
When the window opens, select Xorg as the session, enter the password for the user, and click OK.

This will connect to the desktop.
Once you have logged in, you should be able to access your Ubuntu/CentOS/Debian Desktop environment.
Testing the RDP Connection
To test the connection using the Remote Desktop Connection client on Windows, follow these steps:
1. Launch the Remote Desktop Connection app. You can do this by searching for "Remote Desktop Connection" in the Start menu or by pressing the Windows key + R to open the Run dialog box and then typing "mstsc" followed by Enter.
2. Once the Remote Desktop Connection window appears, you will see various input fields. Locate the "Computer" field and enter your remote server's public IP address.
3. Next, find the "User name" field and enter the username associated with your remote server. This is typically the username you use to log in to your server.
4. If you want to save these settings for future use, you can click on the "Save As" button and provide a name for the connection file.
5. Once you have entered the necessary information, click on the "Connect" button to initiate the connection.


