




Installing and Configuring Portainer CE
Level: Beginner
Time to complete: ~30 minutes
Goal: Upon completion of this guide, you will have a fully configured Portainer CE panel secured with HTTPS and ready to manage your server's Docker infrastructure.
Introduction
Docker-based containerization has become the standard for server infrastructure, ensuring predictable deployment and efficient service scaling. However, when running dozens of containers, managing them solely through the command line becomes inconvenient. Portainer CE solves this problem by providing a user-friendly web interface for Docker administration: it provides access to all containers, their statuses, logs, and resources, and management is performed in a few clicks without losing system control.
Server Preparation
Before installation, it is necessary to ensure that the server is ready for Portainer deployment. Portainer itself runs as a container, so only Docker needs to be installed.
System requirements
- Operating system: Any Linux distribution (Ubuntu 20.04+, Debian 11+, CentOS/Rocky Linux 8+) used in hosting.
- Privileges: root access or the ability to execute commands via sudo.
- Hardware requirements: Minimum 1 GB RAM and 10 GB free disk space.
- Network requirements: Open ports 8000 and 9443 for Portainer access, port 443 for reverse proxy configuration.
Checking Docker availability
Connect to the server via SSH. First of all, check whether Docker is installed and whether the daemon is running:
  docker --version
sudo systemctl status docker
If the Docker version is displayed and the status is active (running), the Docker installation step can be skipped.
Installing Docker (if needed)
On new servers, Docker is typically not present. To install it, run the standard script (for Debian/Ubuntu):
  curl -fsSL https://get.docker.com -o get-docker.sh
sudo sh get-docker.sh
sudo systemctl enable docker
sudo systemctl start docker
To install the Docker Compose plugin (if it was not installed in the previous step), run:
  sudo apt-get install docker-compose-plugin   # For Debian/Ubuntu
# or
sudo dnf install docker-compose-plugin       # For CentOS/Rocky Linux
Check the version of the installed docker compose:
docker compose version
Deploying Portainer CE in Docker
There are two main ways to run Portainer: via the docker run command (quick start) and via docker-compose.yml (convenient for configuration versioning).
Method 1: Running via docker run
Run the following command on the server:
  sudo docker run -d \
  -p 8000:8000 \
  -p 9443:9443 \
  --name portainer \
  --restart=always \
  -v /var/run/docker.sock:/var/run/docker.sock \
  -v portainer_data:/data \
  portainer/portainer-ce:latest
The command is run via sudo because the current user has not yet been added to the docker group. If you plan to use docker without sudo later, add the user to the docker group: sudo usermod -aG docker $USER. After executing the command, you need to log out and back in, or restart your session.
Explanation of parameters:
- -d – Run the container in the background.
- -p 8000:8000 – Port forwarding for Edge agents and tunnels.
- -p 9443:9443 – Port forwarding for the secured web interface (HTTPS). Portainer automatically generates a self-signed SSL certificate.
- --name portainer – Assigns a meaningful name to the container.
- --restart=always – Automatic container restart policy in case of failures or server reboot.
- -v /var/run/docker.sock:/var/run/docker.sock – Mounts the Docker socket inside the Portainer container. This allows Portainer to interact with and manage the Docker daemon on the host.
- -v portainer_data:/data – Creates a named volume for storing Portainer data (users, settings, connection configurations).
- portainer/portainer-ce:latest – The image with the latest stable version of the Community Edition.
Method 2: Running via docker-compose
To use this method, create a directory and a docker-compose.yml file:
  mkdir ~/portainer-docker
cd ~/portainer-docker
nano docker-compose.yml
Insert the following content:
  services:
  portainer:
    image: portainer/portainer-ce:latest
    container_name: portainer
    restart: always
    ports:
      - "8000:8000"
      - "9443:9443"
    volumes:
      - /var/run/docker.sock:/var/run/docker.sock
      - portainer_data:/data
volumes:
  portainer_data:
Save the file and run the command:
docker compose up -d
Initial launch and web interface setup
After the Portainer container is started, it becomes accessible over the network.
Step 1. Connecting to the web interface
Open a browser and go to: https://<server-IP-address>:9443.
Due to the use of a self-signed certificate, the browser will display a warning. This is normal for the first run. You must proceed to the site (for example, click "Accept the Risk" or "Proceed to the site").
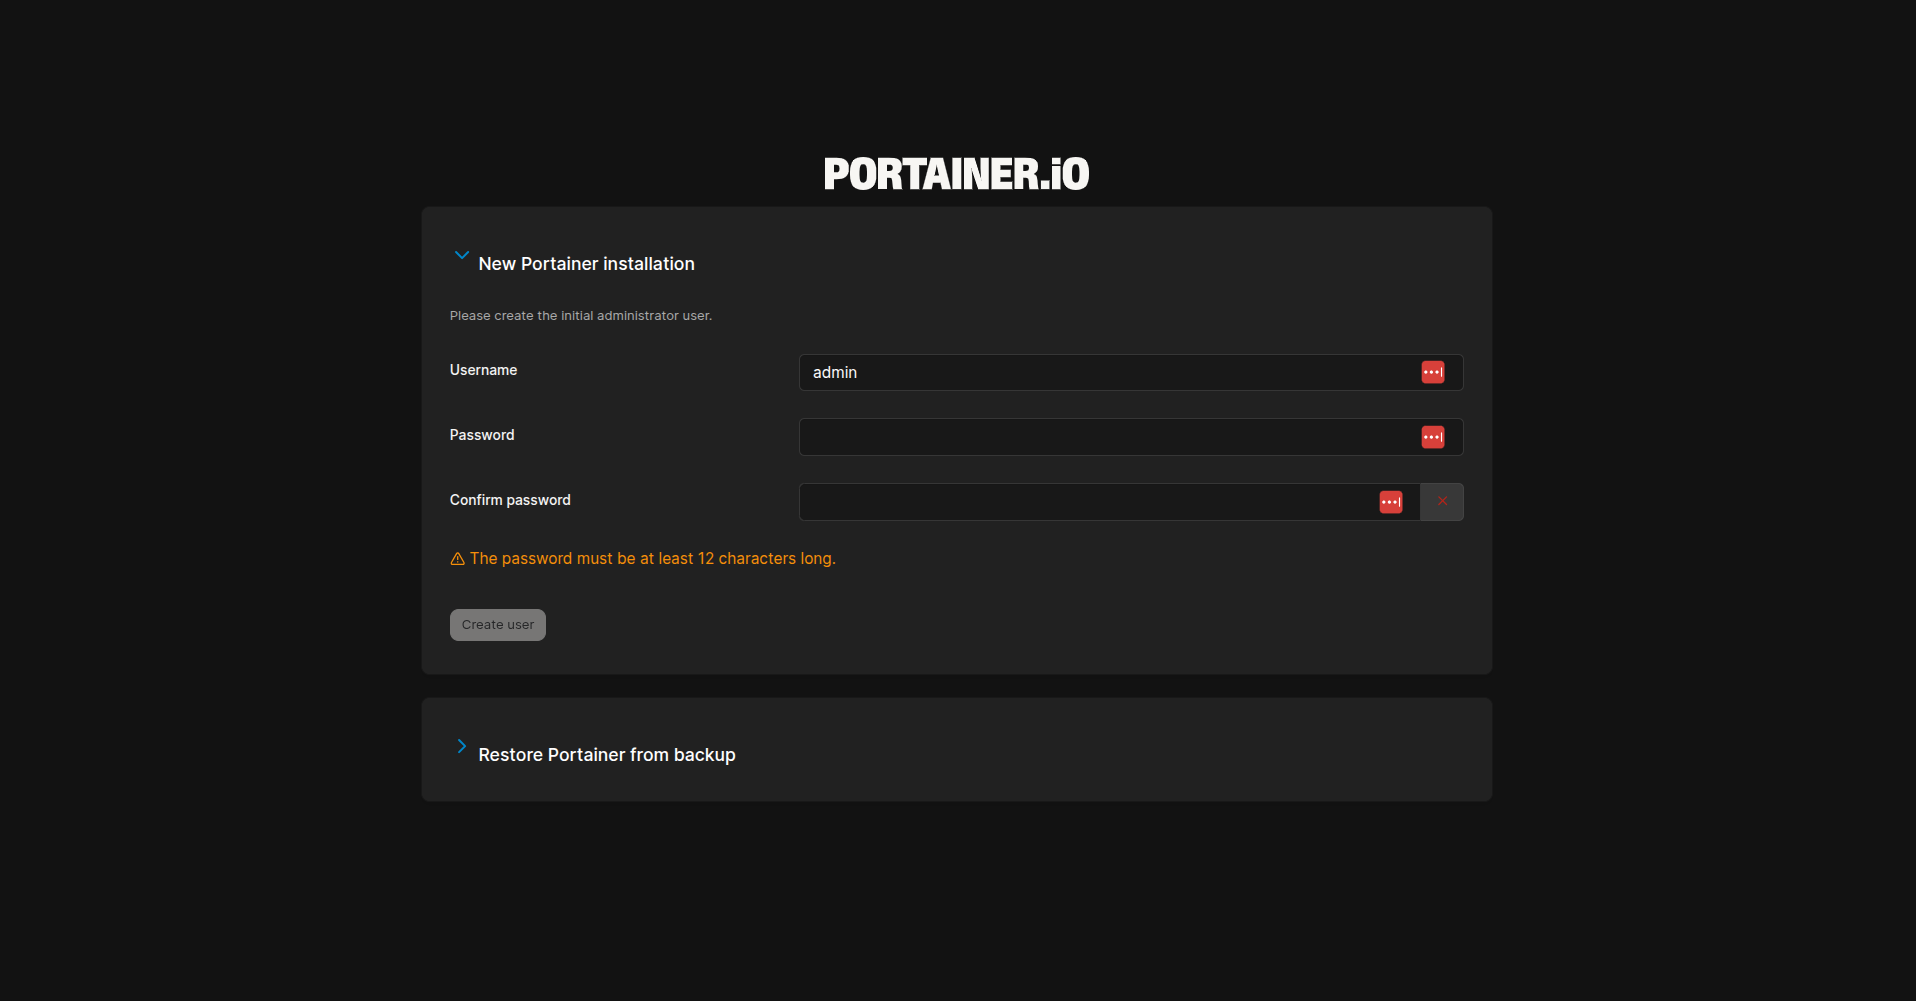
Step 2. Creating a user
On the registration page, you will need to specify a username (admin is recommended) and set a strong password.
The password must be complex, as it provides full access to container management.
Step 3. Connecting the environment
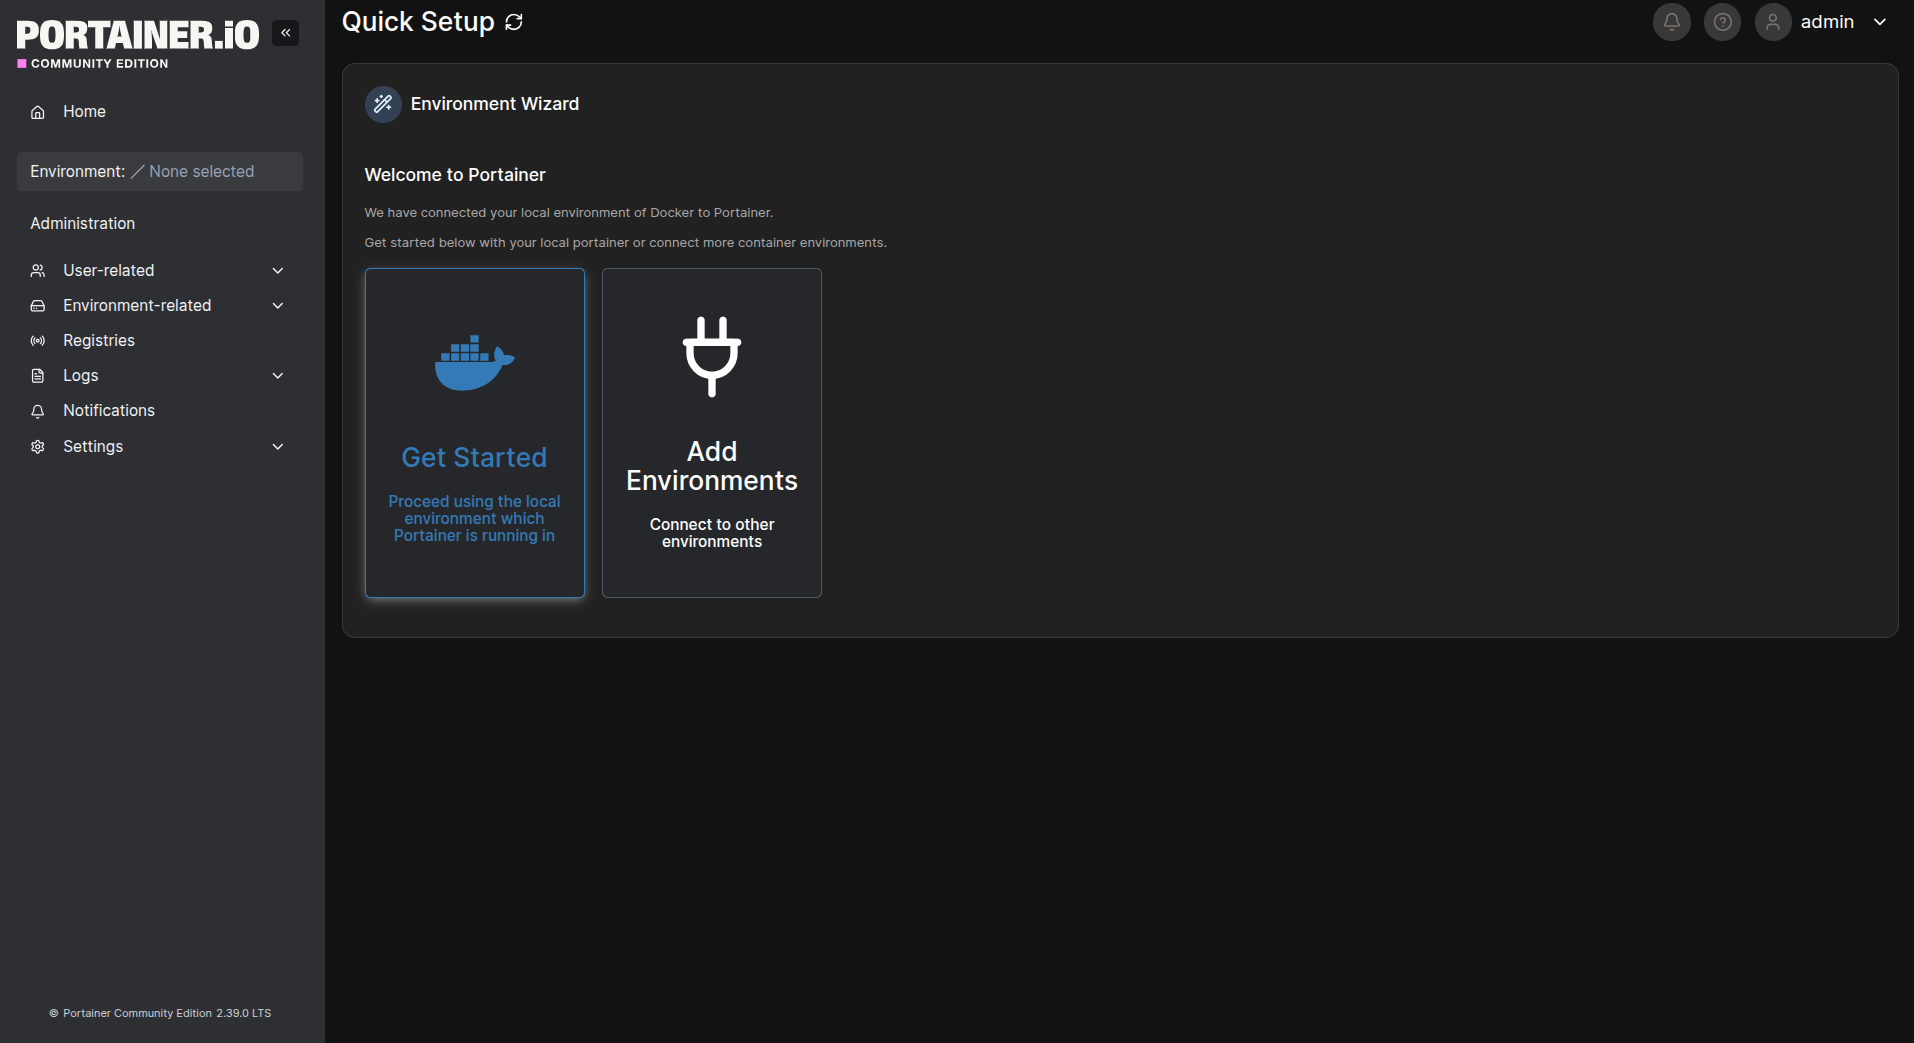
After creating the user, Portainer will prompt you to connect environments. At this stage, you can either connect the local Docker (already available thanks to the mounted socket) or proceed to add remote environments via the "Add Environments" button. Remote environments are useful when you need to manage multiple servers from a single Portainer interface: for example, adding Docker hosts in different data centers or servers with Kubernetes. The connection is made via Portainer agents or via the API using TLS certificates.
- Select the "Get Started" option. This is the basic scenario for a single server.
- Portainer will automatically detect the local Docker socket. It will be displayed as "local".
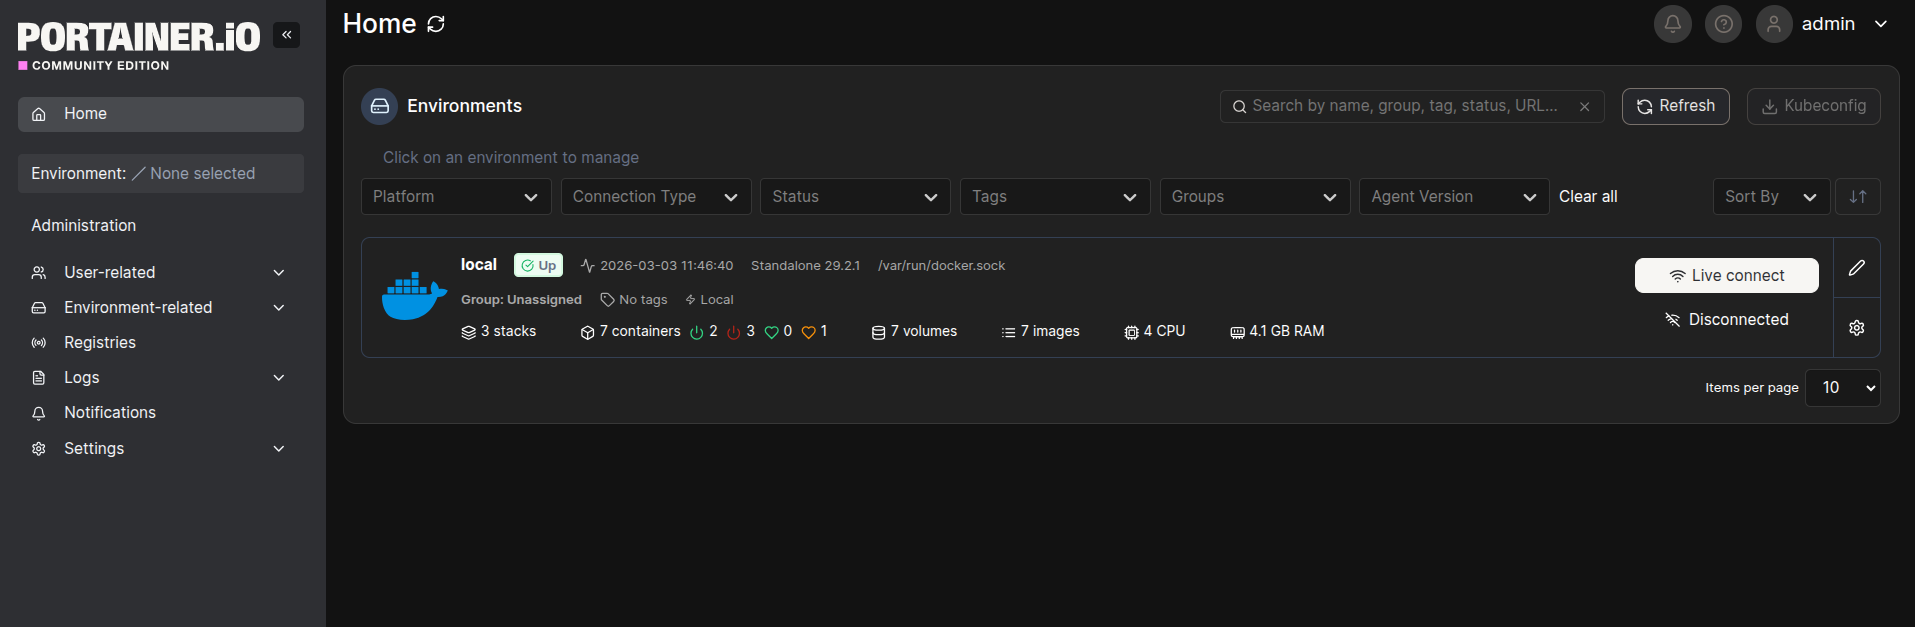
- Click on it to complete the setup.
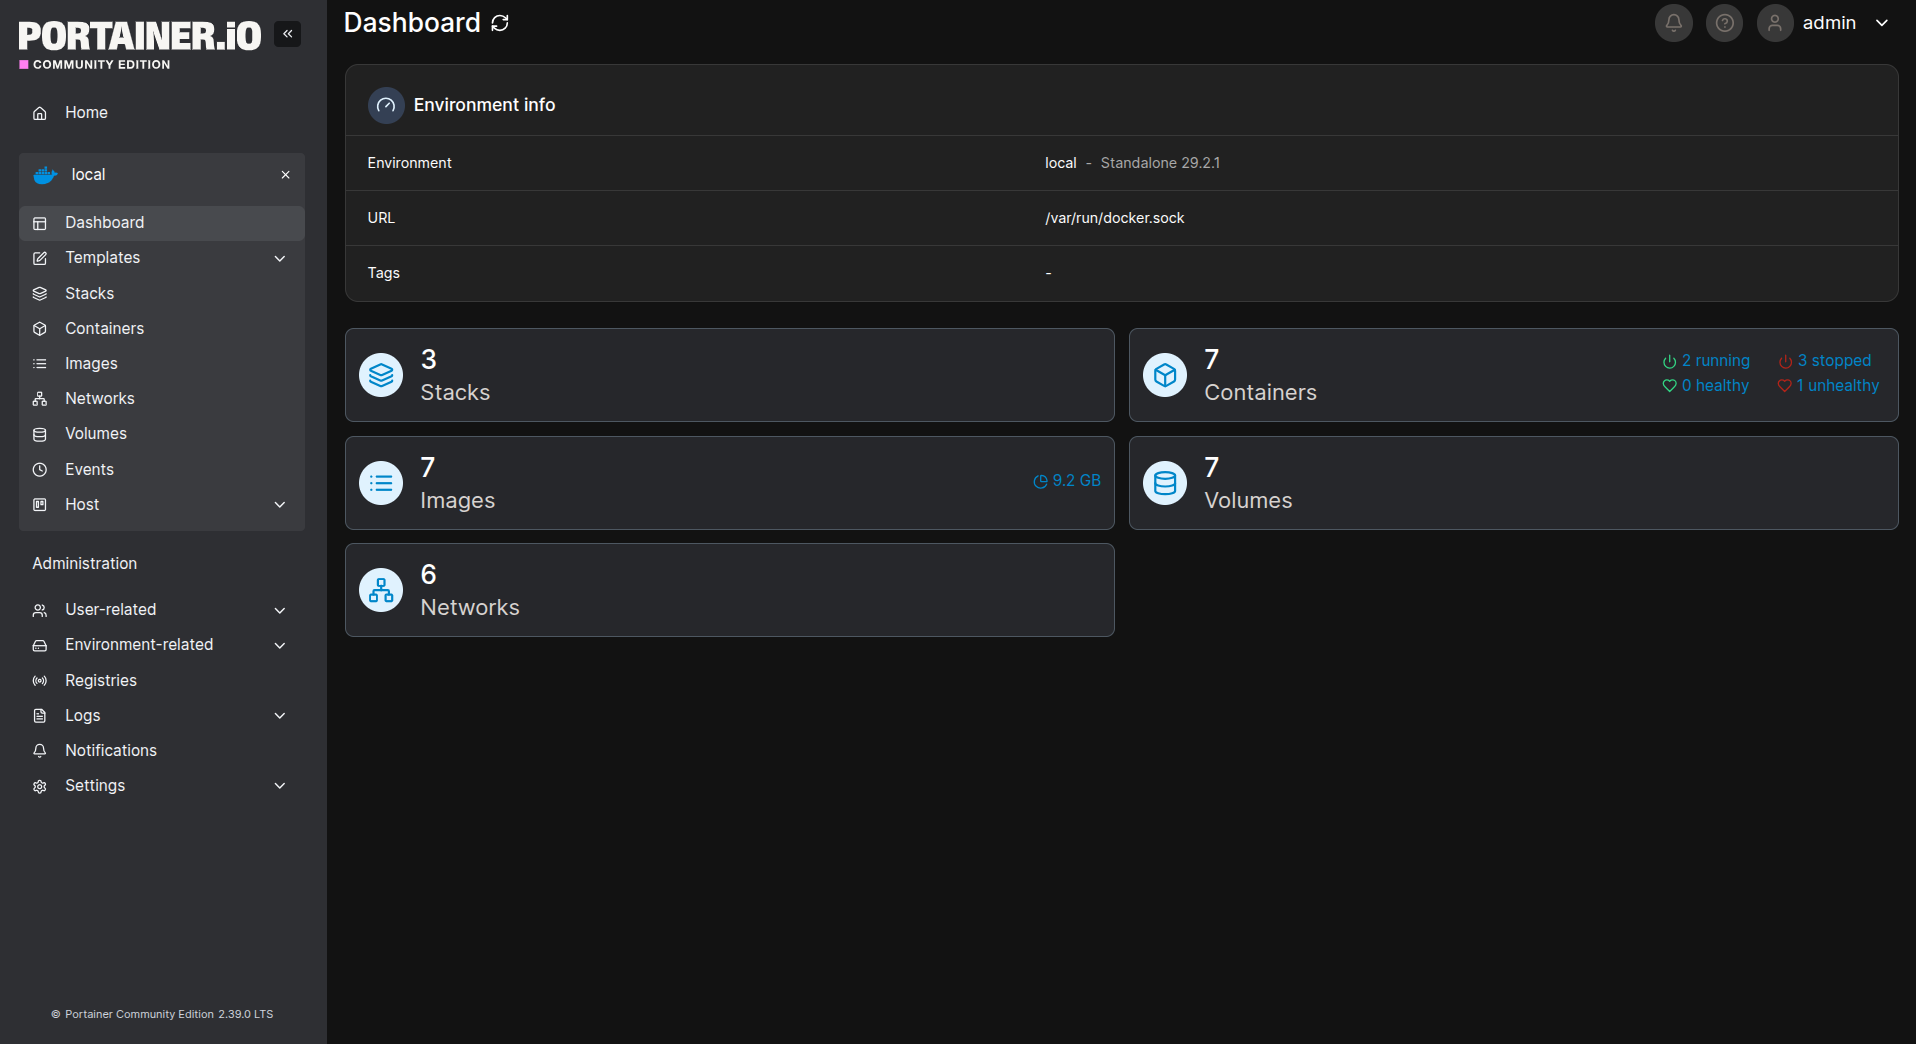
The setup is complete. The Portainer dashboard (main screen) will open with brief statistics on containers, images, volumes, and networks.
Main features of Portainer
Let's look at the main sections of the interface that are used for daily administration tasks.
Dashboard
The start screen that displays the overall picture: the number of running and stopped containers, the number of downloaded images. Allows you to quickly assess the server state.
Containers
- The central management section. Displays a list of all containers.
- Container management: Start, stop, restart, delete a container with a single click.
- Logs: The "Logs" tab provides access to viewing container logs in real time.
- Inspect: Displays complete information about the container in JSON format: environment variables, mount points, network settings.
- Stats: Graphs of CPU, memory, and network consumption for each container. Helps determine resource consumption by individual services.
- Exec console: Ability to open a web terminal inside a container to execute commands.
Stacks
Implementation of Docker Compose in the web interface. Allows you to upload or create YAML files directly through the browser for deploying multi-container applications.
Images
- Docker image management.
- Pull: Ability to download images (e.g., nginx:latest or mysql:8.0) directly from the interface.
- Remove: Cleaning up unused images to free up disk space.
Volumes
Management of persistent data volumes. Displays existing volumes, their attachment to containers, and the space they occupy. Critically important for databases and user data.
Networks
Allows you to create isolated networks for container interaction.
Rollback changes (Removing Portainer)
If you need to completely remove Portainer and its data from the server, follow these steps:
1. Stop and remove the Portainer container:
  sudo docker stop portainer
sudo docker rm portainer
2. Remove the Portainer data volume (warning: this action is irreversible):
sudo docker volume rm portainer_data
Deleting the portainer_data volume will lead to irreversible loss of all users, settings, and configurations of Portainer.
3. Remove the Portainer image (optional):
sudo docker rmi portainer/portainer-ce:latest
Security and recommendations
For Production, additional security configuration of Portainer is required.
Using a Reverse Proxy (Nginx/Apache)
It is recommended to set up a subdomain (e.g., portainer.domain.com) and proxy traffic through Nginx. This will provide:
- Use of a valid SSL certificate (free from Let's Encrypt or a paid SSL, e.g., from Sectigo).
- Centralized access logging.
- Ability to configure additional authentication.
1. Installing and configuring Nginx
Install Nginx:
  sudo apt install -y nginx              # For Debian/Ubuntu
# or
sudo dnf install -y nginx              # For CentOS/Rocky Linux
Create a configuration file for Portainer:
sudo nano /etc/nginx/sites-available/portainer.conf
Add the following configuration, replacing <YOUR_DOMAIN> with your domain that points to the server's IP:
  server {
    listen 80;
    server_name ;
    location / {
        proxy_pass https://localhost:9443;
        proxy_http_version 1.1;
        proxy_set_header Upgrade $http_upgrade;
        proxy_set_header Connection 'upgrade';
        proxy_set_header Host $host;
        proxy_set_header X-Real-IP $remote_addr;
        proxy_set_header X-Forwarded-For $proxy_add_x_forwarded_for;
        proxy_set_header X-Forwarded-Proto $scheme;
        proxy_cache_bypass $http_upgrade;

        # Timeouts for long operations
        proxy_connect_timeout 600;
        proxy_send_timeout 600;
        proxy_read_timeout 600;
        send_timeout 600;
    }
}
Activate the configuration:
sudo ln -s /etc/nginx/sites-available/portainer.conf /etc/nginx/sites-enabled/
Check the Nginx configuration:
sudo nginx -t
If the check is successful, restart Nginx:
sudo systemctl restart nginx
2. Setting up HTTPS (recommended)
Install Certbot:
sudo apt install -y certbot python3-certbot-nginx
Obtain an SSL certificate:
sudo certbot --nginx -d
Replace <YOUR_DOMAIN> with your domain.
During the installation, enter your email, for example, admin@<YOUR_DOMAIN>, then press Y twice.
Check automatic certificate renewal:
sudo systemctl list-timers | grep certbot
Firewall configuration
Direct access to Portainer ports should be restricted. Allow access to ports 8000 and 9443 only from trusted IP addresses.
Be careful with firewall rules. Incorrect configuration may block your access to the server.
Example for UFW:
  sudo ufw allow from 192.168.1.0/24 to any port 9443 proto tcp
sudo ufw deny 9443
Where 192.168.1.0/24 is the subnet of trusted IP addresses.
Regular updates
It is recommended to track the release of new Portainer versions and update the container in a timely manner to eliminate potential vulnerabilities.
Verifying operation
To verify that Portainer is working correctly, perform the following actions.
1. Visual check: In the "Containers" section, ensure that the portainer container has a running status.
2. Creating a test container:
- Go to the "Containers" section, click the "Add container" button.
- In the "Name" field, specify test-nginx.
- In the "Image" field, specify nginx:alpine.
- In the "Port mapping" section, specify host port 8080, container port 80.
- Click "Deploy the container".
3. Accessibility check:
- Wait for the container to appear in the list with a running status.
- Open a browser and go to
http://<YOUR_IP_ADDRESS>:8080. The Nginx welcome page should be displayed.
4. Management check:
- In Portainer, find the test-nginx container and click the "Stop" button.
- Refresh the Nginx page in the browser – access should be unavailable.
- Click "Start" – access to the page should be restored.
Troubleshooting
Issue 1: Unable to open the Portainer web interface at https://<YOUR_IP_ADDRESS>:9443
Possible cause: Firewall is blocking port 9443.
Solution: Check the firewall rules and make sure the port is open. For UFW: sudo ufw status | grep 9443.
Issue 2: Error "Cannot connect to the Docker daemon" when running Docker commands.
Possible cause: The Docker daemon is not running, or the user lacks permissions.
Solution: Start the daemon: sudo systemctl start docker. If you added the user to the docker group, log out and log back in.
Issue 3: The Portainer container does not start and immediately exits (status exited).
Possible cause: Port conflict or a corrupted image.
Solution: Check whether port 9443 is occupied by another application: sudo ss -tulpn | grep 9443. Try reassigning the port and restart the container: sudo docker restart portainer.
Conclusion
Portainer CE provides an effective tool for visual monitoring and management of Docker containers. The ability to quickly assess the status of containers, analyze resource consumption graphs, and perform typical operations without connecting via SSH reduces incident response time and simplifies daily administration.
This tool can be useful when it is necessary to provide limited access to container management to developers or less experienced staff without granting direct access to the server command line. Portainer CE is a standard solution for visualizing container infrastructure and is recommended for use on servers.
Document Version: 1.1
Last Updated: March 2026
Owner: Technical Documentation Team






























