
SSH key authentication in PuTTY
Introduction:
aaa
This tutorial will guide you through the process of configuring SSH keys authentication with PuTTY and a Linux server. By using key-based authentication instead of password-based authentication, you can enhance the security of your SSH connection. With key-based authentication, only individuals who possess the corresponding private key can log in, ensuring a more secure and reliable method of authentication.
SSH keys authentication is a powerful and secure method for logging into a Linux server without the need for passwords. This guide will walk you through the process of configuring SSH keys authentication using PuTTY, a popular SSH client for Windows.
1) Generating keys on Linux
Puttygen is a powerful tool for generating SSH key pairs on the Linux version of PuTTY. Its main function is to create public and private key pairs, which are stored in .ppk files. Additionally, Puttygen can convert key formats, providing users with flexibility and compatibility across various SSH clients and servers.
Puttygen is an essential tool for generating SSH keys on the Linux version of PuTTY. Similar to the ssh-keygen tool in OpenSSH, Puttygen allows users to generate both public and private key pairs. The generated keys are stored in PuTTY's own format, specifically in .ppk files.
One of the primary functions of Puttygen is to create key pairs. These pairs consist of a public key, which is meant to be shared with others, and a private key, which must be kept secure and never shared. The public key is used for authentication purposes, allowing users to securely connect to remote servers or systems.
PuTTY's key format, stored in .ppk files, is specific to the PuTTY software. However, Puttygen has the additional capability to convert key formats. This means that users can convert their .ppk files into other commonly used formats, such as OpenSSH's key format, allowing for compatibility with different SSH clients or servers.
Prerequisites
Before we begin, make sure you have the following prerequisites:
- 1. PuTTY - A SSH client software, such as PuTTY. You can download PuTTY from here.
- 2. Linux Server - The server where you will be connecting using SSH.
- 3. SSH Key Pair - A public-private key pair generated by the server or client using ssh-keygen.
A step-by-step guide to generating keys on Linux
Run the ssh-keygen utility. It asks you where to save the keys and asks you to set a password (you can do it without a password).
ssh-keygen
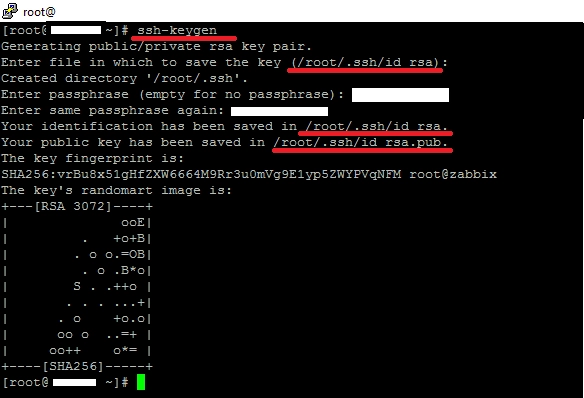
Now we have two keys that were saved in the .ssh directory: id_rsa - the private key and id_rsa.pub - the public key
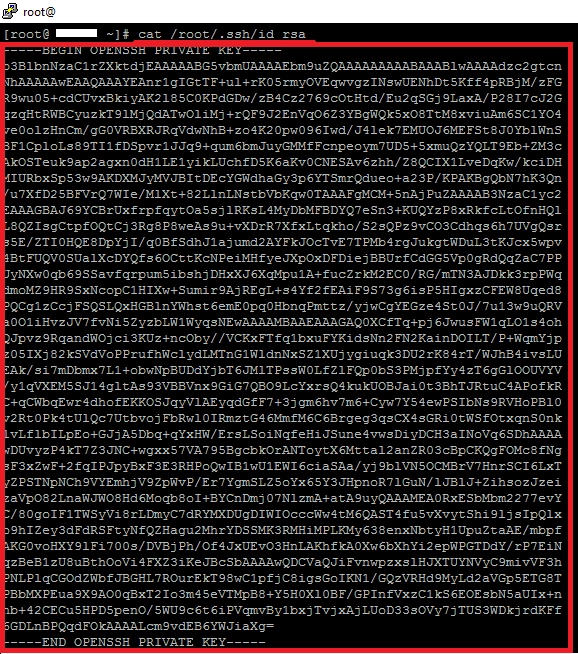
The keys look like text. This makes them easy to view, copy and paste into the desired file.
cat /root/.ssh/id_rsa
cat /root/.ssh/id_rsa.pub

Go to the .ssh folder
cd /root/.ssh
Let's write our key to the desired file
cat id_rsa.pub > authorized_keys
Changing the rights to the file
chmod -c 0600 id_rsa
2) Authorization to the server using PuTTY
On the server, run the command
cat /root/.ssh/id_rsa
Copy the contents of the key, paste it into notepad and save it with the *.ppk extension
Open PuTTY Key Generator and load our key with "Load" button
Save our key, agree to create without a password
(If you have set a password on the keys in step 1, specify this password)
Next, open the PuTTY client. As usual, in the main window specify where we connect, and on the left side select "Connection → SSH -> Auth", in the window select our key
Connect, login to the server, get to the server without a password
In PuTTY, you can also specify a login right away.
Go to "Connection → Data" and in the "username" field of the "Auto-login" section, specify the login for the session.
Conclusion
By configuring SSH keys authentication with PuTTY and a Linux server, you can establish a more secure and reliable connection. Using SSH keys eliminates the need to enter passwords, reducing the risk of exposure. Follow the steps outlined in this document to set up SSH keys authentication with PuTTY and enjoy the benefits it brings.


